Mesh steel reinforcement is welded wire fabric arranged in a grid to control cracking and add tensile capacity in concrete slabs and walls. It is factory-welded for consistency and speed compared with hand-tied bars. For Ontario jobs across Woodbridge and the GTA, Dass Rebar supplies standard 6×6 mesh in 6/6, 9/9, and 10/10 gauges with in-house logistics support.
By Navjot Dass · Last updated: 2026-05-19
Summary
Mesh steel reinforcement, often called welded wire mesh, uses factory-welded steel wires in a 6×6 grid to control shrinkage and temperature cracking. It installs faster than loose bar mats, supports slab performance, and pairs well with 10M rebar at edges, openings, and load paths when detailing is coordinated.
This complete guide explains what mesh is, when to use it, how to place it, and how to avoid the common mistakes that cause curling, random cracks, and callbacks. You’ll also learn how our in-house estimating, detailing, fabrication, delivery, and assembly help Ontario contractors keep pours on schedule.
- What mesh steel reinforcement is and how it works in concrete
- Where mesh beats loose bars—and where rebar grids are still better
- How to select 6/6, 9/9, or 10/10 for slabs-on-grade
- Placement, laps, chairs, and tie practices that actually hold during a pour
- How Dass Rebar’s coordinated trucking fleet keeps pours on time
Local considerations for Woodbridge and the GTA
- Schedule pours around freeze–thaw swings. Spring and fall cold snaps increase curling risk; mesh near mid-depth helps control shrinkage cracking during temperature drops.
- Coordinate staging for multi-site crews. GTA traffic windows mean tighter delivery slots; use our dedicated trucks to receive mesh within the agreed pour window.
- Plan for infrastructure compliance. For municipal work, pair mesh with MTO-approved 400W/500W bar at joints, edges, and penetrations per project specs.
What is mesh steel reinforcement?
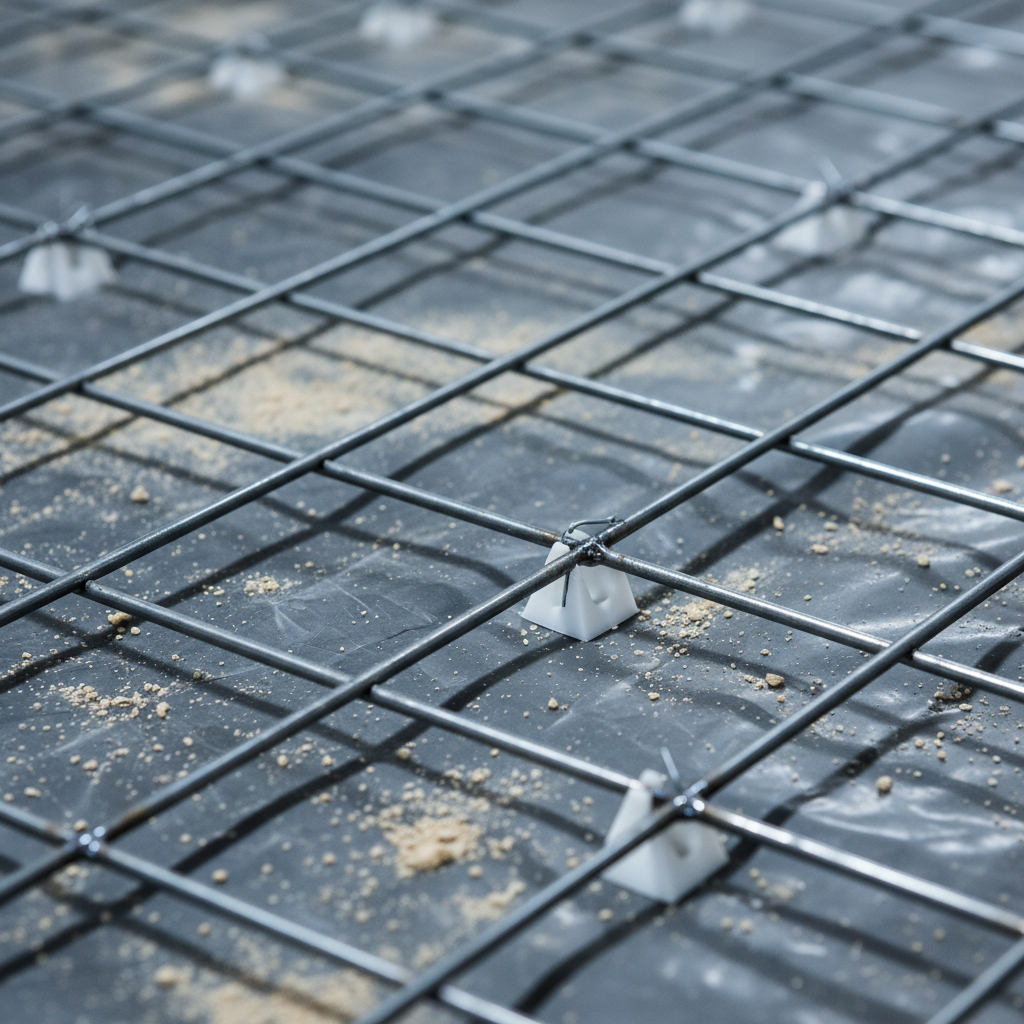
Mesh steel reinforcement is a prefabricated grid of welded steel wires, typically spaced 6 inches by 6 inches. It controls shrinkage and temperature cracks in slabs and walls, speeds installation versus hand-tied bars, and offers consistent steel area per foot thanks to factory welding and standardized gauges.
In plain terms, mesh is a ready-made mat. The wires are resistance-welded at every intersection, creating a uniform grid that acts like many mini-rebars. Because intersections are fused, structural performance is more predictable than loose wires tied in the field.
- Typical mesh patterns: 6×6 grid in 6/6, 9/9, or 10/10 gauges used on Ontario slabs-on-grade and light structural toppings.
- Purpose: Control shrinkage and temperature cracking so cracks that do form are tighter, straighter, and easier to seal.
- Install speed: Large sheets or rolls cover area rapidly, reducing on-site tying time compared with individual bars.
- Consistency: Factory welding maintains intersection strength and wire spacing within tight tolerances.
At Dass Rebar, we stock standard welded wire mesh configurations alongside Grade 500W and 400W bar, epoxy-coated options, and Glass Fibre Reinforcing Bars (GFRB). That lets our team detail smart hybrids: mesh for general crack control with 10M/15M rebar where load paths demand bar steel.
Why mesh steel reinforcement matters for your slab
Mesh matters because it manages shrinkage and temperature cracking economically while speeding placement. When paired with proper chairs and correct laps, it holds position during the pour, keeps cracks tight, and reduces callbacks for random cracking, slab curling, and joint spalling.
Concrete shrinks as it cures and moves with temperature. Without reinforcement, cracks open wider and wander. With mesh at the right depth, those cracks tend to be finer and controlled. Tighter cracks mean cleaner joints, less spalling at saw cuts, and better long‑term performance of floor finishes.
- Crack control: 6×6 grids distribute many small steel elements, restraining micro-movements across the slab plane.
- Speed: Crews can place full sheets quickly. On typical pours, coverage efficiency improves noticeably over hand-tying bar.
- Predictability: Factory-welded intersections help ensure uniform behavior under shrinkage and thermal loads.
- Hybrid detailing: Use mesh in the field and 10M rebar at perimeters, columns, and openings for strength where it counts.
We’ve found that coordinating mesh placement with our shop drawings and pour sequencing minimizes mid-pour adjustments. That’s why our in-house detailing and project management often bundle with delivery: the fewer variables on pour day, the better the slab turns out.
How mesh steel reinforcement works inside concrete
Mesh works by providing distributed tensile steel close to the slab’s tension zone. As concrete shrinks or heats and cools, the welded grid resists movement, limiting crack width. Correct cover, mid-depth placement, and proper laps are critical to performance.
Concrete is strong in compression but weak in tension. Slabs-on-grade see tension near the top or bottom depending on curling and restraint. Placing mesh near mid-depth (often around slab center) captures tensile strains from both directions and helps keep cracks narrow.
- Depth matters: Mid-depth positioning improves crack control during both drying shrinkage and temperature cycling.
- Continuity: Laps align wires so load transfers across sheets; this keeps reinforcement continuous.
- Anchorage: Tying mesh to perimeter bars reduces edge lift and supports load transfer into thickened edges.
- Chairs: Plastic or steel chairs maintain cover; without chairs, mesh sinks, and effectiveness drops sharply.
In our experience across Ontario, the most common issue isn’t mesh selection—it’s mesh placement. When crews skip chairs, the grid ends up at the bottom. The result: visible random cracks within weeks. Simple habits—chairs at planned spacing, pre-tied laps, and staged sheets—prevent those headaches.
Types of mesh steel reinforcement and how to select the right one
Most slab projects use 6×6 welded wire mesh in 6/6, 9/9, or 10/10 gauges. Select heavier gauges for higher traffic, thicker slabs, or reduced joint spacing. Pair mesh with rebar at edges, penetrations, and concentrated loads for robust hybrid reinforcement.
Dass Rebar maintains stock of standard mesh patterns so you can match engineering specifications quickly. Our estimating team will review drawings, confirm load paths, and recommend mesh plus localized rebar for edges and openings where stress concentrates.
- 6×6–6/6: Lighter grid for light-duty slabs, walkways, and residential toppings when specified.
- 6×6–9/9: Versatile choice for many slabs-on-grade, small commercial floors, and driveways.
- 6×6–10/10: Heavier mesh favored where joint spacing is tighter or wheel loads are higher.
- Hybrid detail: Use 10M rebar at edges and sawcut joints; keep mesh continuous in the field.
Need help deciding between mesh and a bar mat? Our team can compare steel areas and spacing in your spec and advise whether a welded mesh or a tied 10M/15M bar grid is the better fit. Either way, timely delivery from our dedicated trucking fleet keeps your pour window intact.
Mesh vs. rebar: when to use each (and both)
Use welded wire mesh for efficient crack control in wide slab areas, and use deformed rebar (10M/15M) where loads concentrate—edges, columns, openings, and thickened slabs. The best results often come from combining both based on detailing and load paths.
Both reinforcement types strengthen concrete in tension. Mesh is quick and uniform across large areas; rebar offers higher bar-by-bar capacity and targeted reinforcement. Smart detailing blends them so you get speed in the field with strength where it counts.
| Scenario | Better with Mesh | Better with Rebar | Best Practice |
|---|---|---|---|
| Large slab field | Yes | Sometimes | Mesh in field; add bars at penetrations |
| Edges and thickened slabs | No | Yes | Use 10M/15M rebar continuous around perimeter |
| Under point loads | Limited | Yes | Bar grid or double mats near columns |
| Rapid installation | Yes | Slower | Mesh sheets or rolls reduce tying time |
| Crack width control | Yes | Yes | Combine: mesh field + bars at joints |
If you’re debating trade-offs, our rebar fabrication guide and reinforcing steel overview outline when bar density outperforms mesh—especially near supports and load transfers.
Installation best practices that prevent callbacks
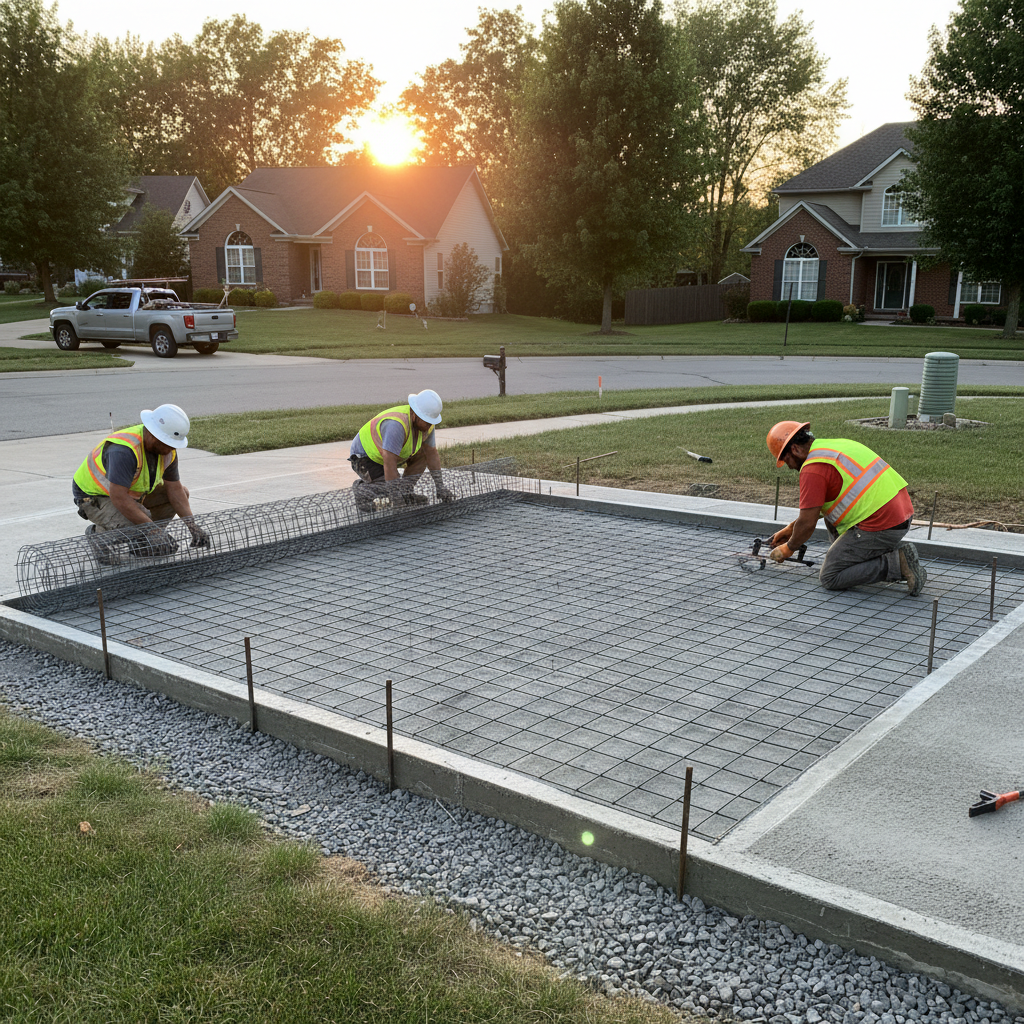
To get results from mesh, keep it at the correct depth with chairs, pre-tie laps, stage sheets for continuous placement, and secure edges to perimeter rebar. This stops sinking during the pour, maintains steel continuity, and keeps cracks tight and predictable.
- Pre-plan staging: Stack sheets near the pour sequence to avoid delays and mid-pour traffic over placed mesh.
- Use chairs generously: Maintain cover; don’t rely on raking mesh up during the pour—it rarely stays in place.
- Lap correctly: Follow drawings; align wires so tensile force crosses the lap through welded intersections.
- Tie to edges: Wire mesh to perimeter bars to reduce edge lift and transfer loads.
- Protect membranes: Place on vapor barrier without puncturing; use bar supports intended for membranes.
Our in-house detailing simplifies these steps. Shop drawings show lap zones, chair spacing, and tie locations. On complex pours, our project management teams sequence deliveries so each truckload lines up with the next slab bay—no idle crew, no scrambling.
Tools, resources, and coordinated services
Successful mesh use depends on clear drawings, reliable supply, and tight logistics. Dass Rebar supports this with in-house estimating, detailing, fabrication, dedicated trucking, and on-site assembly, backed by MTO-approved materials and a resilient JDASS CORP supply network.
- Estimating and takeoffs: Accurate quantities avoid shortfalls mid-pour and reduce over-ordering waste.
- Detailing and shop drawings: Clear laps, chairs, and hybrid mesh–rebar zones prevent field confusion.
- Fabrication: Cutting and bending bars for edges, openings, and dowels that complement mesh.
- Delivery and staging: Coordinated trucks deliver within the pour window to minimize handling and damage.
- Assembly support: On-site assistance for complex tie sequences or congested areas.
Looking for product specs and related steel products within our network? See this concise product view on rebar products to understand how bar sizes pair with mesh in hybrid detailing.
Ontario case examples and what they teach
Across residential, commercial, and municipal projects in Ontario, the best slab performance comes from pairing mesh for field crack control with targeted rebar at edges, columns, and openings. Sequenced deliveries and clear drawings are decisive for smooth pours.
- Residential driveway (GTA): 6×6–9/9 mesh in the field, 10M perimeter bars, and extra bars at the apron transition. Result: tight, straight cracks at saw cuts and clean joints after winter.
- Light commercial floor (Waterloo): 6×6–10/10 mesh with column strip 15M bars. Result: stable floor for racking, fewer random cracks, straightforward joint maintenance.
- Municipal walkways (Durham Region): 6×6–6/6 mesh paired with MTO-approved 400W/500W dowels at joints. Result: consistent alignment and reduced panel lift at bus stops.
These patterns echo our detailing philosophy: use the speed and uniformity of mesh where you can, and add the punch of bar where you must. Pair that with punctual delivery from our trucking fleet, and your pour day stays a pour day.
Specs, compliance, and coordination with drawings
Always follow the project specification for mesh gauge, spacing, laps, and cover. Coordinate mesh with rebar at edges, joints, and penetrations. Clear shop drawings and a pre-pour meeting keep crews aligned and prevent rework.
Our detailing process aligns with the engineer’s drawings and clarifies field realities: where sheets start and stop, how laps align with saw cuts, and how chairs are spaced to maintain cover. We also coordinate rebar at stress points—perimeters, thickened slabs, and concentrated loads.
- Confirm gauge and spacing: 6/6, 9/9, or 10/10 per the spec; do not mix patterns in the same panel without approval.
- Define lap zones: Keep laps out of high-traffic or sawcut paths; stagger when possible.
- Coordinate penetrations: Frame openings with bars; continue mesh continuity around with additional ties.
- Verify cover: Chairs matched to slab thickness and membrane conditions; avoid sinking during placement.
For a refresher on foundational steel choices before locking your spec, our concise steel rebar guide and welded wire mesh explainer are helpful primers for field teams.
Troubleshooting: common mesh mistakes and how to fix them
Most mesh issues trace back to placement: sinks to the bottom, poor laps, or cut sheets at edges. Fix by adding chairs, re-tying laps, and anchoring to perimeter bars. If damage occurs, patch with additional mesh or bars per the engineer’s direction.
- Mesh at the bottom: Add supports, lift and re-tie before placement resumes. Raking during the pour is unreliable.
- Short laps: Extend sheets to meet drawings; tie intersections at regular intervals so the lap acts continuous.
- Edge discontinuity: Tie to perimeter bars; add short bars to bridge discontinuities at slab edges and openings.
- Membrane tears: Seal or replace vapor barrier areas and reset chairs to avoid future moisture migration.
When you spot an issue during the pre-pour walk, pause and correct it. The cost of a quick re-tie is tiny compared with living with a random crack through a high-visibility area for years.
Project planning and delivery logistics
Mesh success depends on materials arriving in sequence, with staging space planned. Dass Rebar’s dedicated trucking fleet coordinates drop times to match pour phasing, reducing re-handling, damage, and crew idle time on Ontario jobs.
We plan deliveries to your staging map: which bay unloads first, where bundles land, and how many crew will move sheets to the slab. That detailed plan, shared at least a day in advance, lets foremen set the pace and reduce mid-pour surprises.
- Pre-pour call: Confirm access, staging zones, and traffic timing for the GTA corridor.
- Bundle labeling: Identify mesh type (6/6, 9/9, 10/10) and destination bay on every pack.
- Safety and handling: Use proper lifts and spreader bars to avoid bending sheets and damaging membranes.
If you prefer a one-page refresher for your crew, see this short primer on wire mesh types and uses to align terminology before the pour.
Related topics and deeper learning
Mesh fits within a broader reinforcement strategy that includes deformed bars, epoxy-coated bars, and GFRB. Learning when to combine them—and how to detail transitions—produces cleaner joints, tighter cracks, and longer-lasting slabs.
Contractors often ask where mesh ends and rebar begins. The right answer is “at the detail.” Our teams routinely blend 6×6 mesh with supplied rebar and reinforcing steel best practices to match engineering intent and field realities.
- Epoxy-coated bar: Use near deicing exposure to protect steel at joints and entries.
- GFRB: Consider for corrosion-prone zones; pair with mesh where specified.
- Detail transitions: Keep laps and splices out of sawcut paths and high-traffic zones when possible.
To browse more practical examples from our network, this quick tag hub on reinforcing steel and mesh collects short reads you can share with field leaders.
Need a second set of eyes? Share your latest slab drawings. Our in-house estimating and detailing team will flag mesh–rebar transitions, lap zones, and staging so your next pour goes smoothly.
FAQ: Mesh steel reinforcement
These concise answers address the most common field questions about welded wire mesh: purpose, placement, laps, and pairing with rebar. Share this section with crew leads before your next slab pour to align expectations and reduce rework.
What does mesh steel reinforcement actually do in a slab?
It controls shrinkage and temperature cracks. The welded grid spreads tensile resistance across many wires, keeping cracks tighter and more predictable. You still need bars at edges, joints, and concentrated loads for structural capacity.
Where should welded wire mesh sit in the slab thickness?
Near mid-depth, supported on chairs. That way, the mesh can respond to shrinkage and temperature movement in either direction. If mesh sinks to the bottom, it loses much of its crack-control benefit.
How do I keep mesh from sinking during a pour?
Use the right chairs, pre-tie laps, and avoid raking mesh up while placing concrete. Plan staging so crews aren’t walking heavy bundles across set mesh, which tends to push it down into the vapor barrier.
When should I choose rebar instead of mesh?
Choose rebar at edges, around openings, under point loads, and where the engineer specifies higher capacity. Many slabs combine mesh in the field for crack control with 10M/15M bars at perimeters and columns for strength.
Conclusion and next steps
Mesh steel reinforcement speeds placement and controls crack width when it’s supported, lapped, and tied correctly. Combine mesh with targeted rebar at edges and openings, and coordinate delivery and staging to keep crews productive and slabs durable.
- Use 6×6 mesh (6/6, 9/9, or 10/10) for efficient crack control across slab fields.
- Detail 10M/15M rebar at edges, penetrations, and high-load zones.
- Rely on chairs, pre-tied laps, and clear shop drawings to maintain depth and continuity.
- Coordinate deliveries with our dedicated trucking fleet for on-time pours across Ontario.
Ready to align your next slab? Share your drawings with our detailing team, and we’ll outline mesh selections, hybrid rebar zones, and a delivery plan that matches your sequence.