
Welded wire mesh for concrete is a prefabricated steel grid that controls shrinkage cracking and improves post-crack performance in slabs, driveways, and floors. It distributes loads and keeps cracks tight. For Woodbridge pours, the right mesh, placed at mid-depth and paired with solid joints, reduces callbacks and keeps schedules intact.
By Navjot Dass | Last updated: 2026-07-09
| In business since | 1986 |
|---|---|
| Approval | MTO-approved supplier |
| Service area | Woodbridge, GTA, and Ontario |
| Hours | Mon–Fri, 7:00–16:30 |
| Key products | Welded wire mesh (6×6 6/6, 9/9, 10/10), Grade 400W & 500W rebar, epoxy-coated rebar, GFRB |
| Logistics | Dedicated trucking fleet for on-time delivery |
Woodbridge delivery tip
Working near Queen St / Highway 50 or the Highway 50 – Zum Queen Stop EB? Share your access notes. We stage on side streets and drop bundles by bay so crews set, tie, and pour without blocking traffic or fighting long carries.
Overview: Which Mesh Where
Pick mesh by use and exposure: W1.4 for light interior slabs and small patios, W2.9 for most residential driveways and garages, and W4 for thicker or frequently loaded slabs. In Woodbridge’s freeze–thaw climate, avoid W1.4 for exposed slabs; step up to W2.9 and plan joints and chairs.
If your subbase isn’t compacted and your joints aren’t laid out before the pour, no welded wire mesh for concrete will save that slab. In our experience across the GTA, correct placement at mid-depth with chairs and a clean joint plan matters more than any single mesh size choice.
What Welded Wire Mesh Actually Does in Concrete (and What It Cannot Do)
Welded mesh restrains shrinkage and temperature movement so cracks are finer and better distributed. It doesn’t fix poor base prep, bad curing, or missing joints. Think of mesh as crack control and post-crack stitching, not a substitute for slab design.
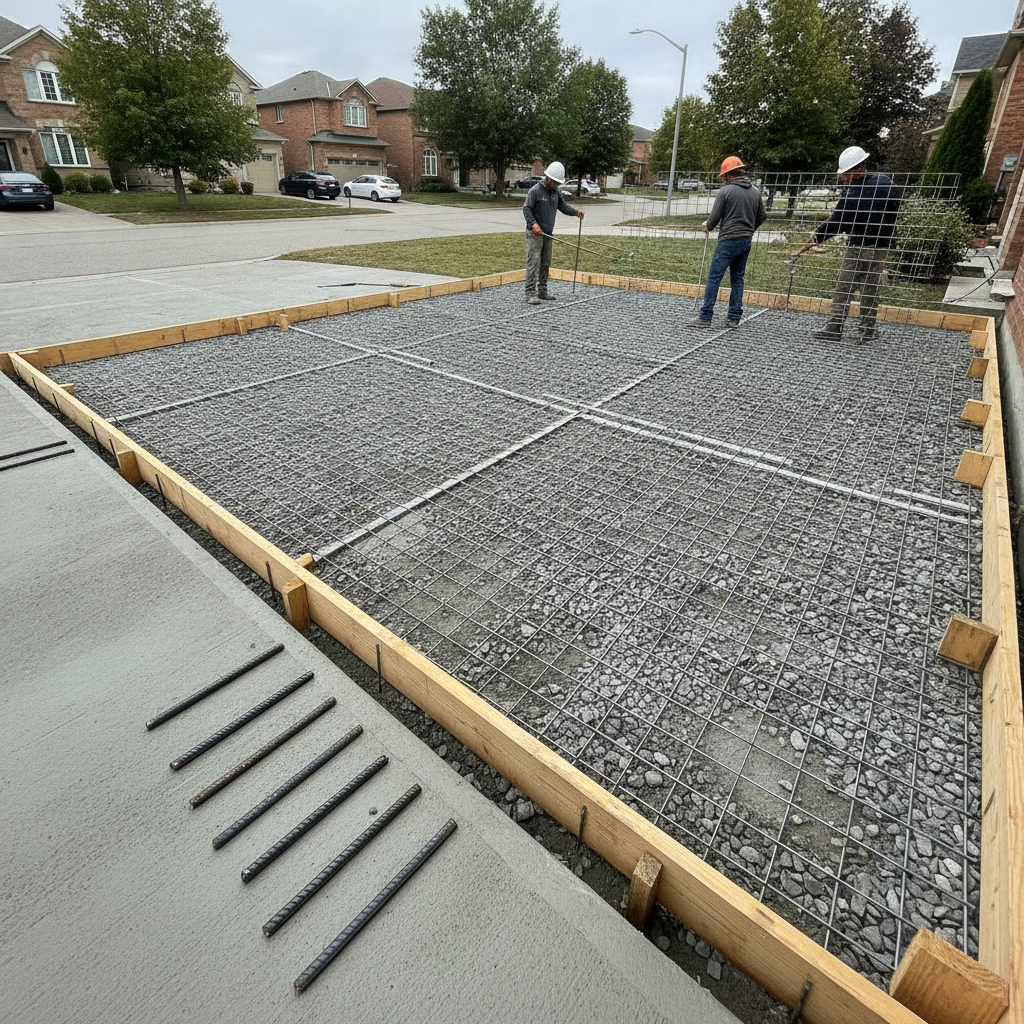
On tight Woodbridge lots, we often see crews tug mesh up with rakes during the pour because supports were forgotten. That creates waves, inconsistent cover, and wide cracks later. Place on chairs before the truck arrives and lock elevations in; pulling mesh mid-pour is a recipe for callbacks.
- Mesh does
- Limit crack width and tie panels together after cracking.
- Distribute wheel loads to reduce localized distress.
- Help slabs ride better over minor base variations.
- Mesh does not
- Replace joints, curing, thickness, or compaction.
- Carry heavy point loads by itself.
- Overcome saturated clay subgrades in the Humber corridor.

The Three Mesh Specs Dass Rebar Stocks — and When Each Is Right
We stock 6×6 welded mesh in W1.4/W1.4 (6/6), W2.9/W2.9 (9/9), and W4/W4 (10/10). W1.4 suits light, interior slabs; W2.9 fits most driveways and garages; W4 supports thicker or frequently loaded slabs. Pair selection with chairs, joint layout, and sound base prep.
Freeze–thaw and deicing salts in Woodbridge push many “borderline” patios out of W1.4. We often recommend W2.9 outside, then add edge bars or dowels where vehicles cross. For chloride exposure at garage aprons, our team frequently specifies epoxy-coated rebar at edges or suggests GFRB where corrosion resistance is the priority.
| Spec | Typical use | Slab notes | Placement |
|---|---|---|---|
| 6×6 W1.4/W1.4 (6/6) | Light interior slabs, small patios | Low loads; avoid exposed freeze–thaw | Chairs at mid-depth; tight laps |
| 6×6 W2.9/W2.9 (9/9) | Driveways, garages | Balanced choice for passenger vehicles | Chairs; dowel aprons and joints |
| 6×6 W4/W4 (10/10) | Thicker pads, frequent loading | Better post-crack capacity | Chairs; consider perimeter bars |
Need more than flat sheets? Our team supports welded wire mesh reinforcement with takeoffs, sheet counts, and lap schedules so your crew places once and pours once.
How to Choose Welded Wire Mesh for Concrete (Step-by-Step)
Send your plan and site notes. We confirm mesh weight, lap schedule, chairs, and joint strategy, then bundle and deliver to match your pour sequence. Most Woodbridge slabs land on W2.9; we step to W4 for thicker or frequently loaded areas.
What our estimators ask for
- Use and exposure: foot traffic, vehicles, deicing salts, or moisture.
- Slab thickness & concrete: planned depth and mix intent.
- Subgrade: soil type (local clays, fill), base thickness, and compaction.
- Joint plan: panel sizes, locations, and any doweled joints.
- Access & staging: truck route and drop points, especially near Queen St / Highway 50.
What you get back
- Marked-up layout with mesh spec (W1.4/W2.9/W4) and lap zones.
- Sheet counts and bundle map per bay to reduce handling.
- Chair type and spacing for mid-depth placement.
- Edge strategy (10M/15M bars or dowels) where needed.
Prefer to self-check first? Our mesh steel reinforcement guide and wire mesh options outline the trade-offs in plain language.
Common Mistakes Contractors Make When Specifying Mesh
Typical problems: under-sizing mesh for exposed slabs, leaving it on the ground, skipping dowels at aprons, and short overlaps. Fix those four and most slab issues disappear.
- Under-spec for exposure: W1.4 on an exposed patio looks fine on paper but struggles after winter. We often move to W2.9 for anything outside.
- Mesh on the vapor barrier: If it isn’t on chairs at mid-depth, it isn’t working. Don’t try to hook it up mid-pour.
- No dowels at transitions: Garages and aprons pump and crack without them; add 10M/15M dowels on a layout.
- Short laps and gaps: Plan staggered laps. Our reinforcing mesh tips show proven lap patterns.
A quick Woodbridge anecdote: a driveway near the Humber clay band looked perfect at finish. A week later, the panel at the apron settled because no dowels were placed and mesh was raked up in waves. We re-detailed the joint, added dowels, and the callback cycle ended.
When to Upgrade from Mesh to Rebar (or Use Both)
Choose deformed rebar where loads concentrate or durability demands rise. Many Woodbridge slabs use mesh in the field with 10M/15M rebar at edges, openings, and joints. Add epoxy-coated bar or GFRB where chlorides or moisture threaten steel.
- Driveways with equipment: W2.9 in the field, 10M bars at wheel paths and aprons.
- Commercial pads: W4 plus perimeter 15M; dowel all joints to control pumping.
- Corrosive zones: Epoxy-coated rebar by vehicular edges; consider GFRB for non-magnetic or high-chloride areas.
We also stock Grade 400W and 500W rebar to match structural needs, and our detailing team marks the drawings so installers know exactly where mesh ends and bars begin.
How Dass Rebar’s Estimating and Delivery Process Works
Email your slab plan and site notes. We run a takeoff, confirm mesh and edge steel, and stage labeled bundles. Our trucks drop at your chosen gate or bay, timed to your pour window, so placement starts immediately.
- Intake: Plans and notes arrive to estimating for a fast review.
- Detailing: We finalize mesh spec, laps, chairs, and any 10M/15M bars.
- Fabrication & staging: Bundles labeled by bay; accessories kitted.
- Delivery: Our fleet coordinates around local traffic patterns to hit your window.
- On-site assembly: Support available for complicated placements.
For broader reinforcement context, explore our welded wire mesh reinforcement guide and rebar and mesh overview. If you’re scanning the market, you’ll see roll products (like 5 ft x 150 ft) promoted by national retailers; for most Woodbridge sites, flat sheets placed on chairs install faster and stay where you set them.
Need a mesh check before you pour? Send plans for a same- or next-business-day review on typical slabs. We’ll confirm the spec, quantities, laps, and drop points, then deliver across Woodbridge on your schedule.
FAQ
Is welded wire mesh enough for a residential driveway?
For most driveways, 6×6 W2.9/W2.9 performs well when placed at mid-depth with proper joints. Add 10M or 15M rebar at aprons, edges, and wheel paths if loads increase or slab thickness grows. We confirm this mix during our takeoff.
Where should welded mesh sit in the slab?
At mid-depth on chairs. Mesh left on the vapor barrier won’t engage after placement. Our detailing notes include support types and spacing so crews hit the right elevation consistently across panels.
Do you deliver welded wire mesh for concrete on short notice?
We coordinate with your pour window and often deliver the same or next business day in Woodbridge, depending on inventory and sequence. Our dedicated trucking fleet places bundles close to forms to reduce handling.
When should I step up from W2.9 to W4?
Use W4 when slab thickness increases, loads are frequent or concentrated, or exposure is harsh. In Woodbridge, we step up for thicker pads, frequent parking, or areas with deicing salts. We’ll flag this during estimating based on your plans and notes.
Local considerations for Woodbridge
- Near Queen St / Highway 50, plan delivery buffers around bus traffic so trucks stage and unload without blocking access.
- Freeze–thaw cycles make W1.4 risky outside; we often recommend W2.9 with well-planned joints for exposed slabs.
- Clay subgrades along the Humber corridor demand better base prep; we’ll prioritize chair spacing and edge restraint in our notes.
Key takeaways
- Match mesh to use and exposure: W2.9 covers most driveways; W4 for thicker or frequent loads.
- Chairs and joint layout matter more than any single spec choice.
- Combine mesh with 10M/15M bars at perimeters, aprons, and openings.
- Our in-house estimating, detailing, and trucking reduce waste and downtime across Woodbridge.
For product context and supply chain details, see welded wire mesh product specs and our network overview on Dass Metal. For use-case ideas, browse our wire mesh applications archive.