Sonotube rebar cages are cylindrical steel reinforcements built to fit inside cardboard or fiber concrete forms to strengthen footings, pier pads, and pole bases. They control cracking, improve load transfer, and keep anchor bolts aligned during pours. In Woodbridge, they’re common for decks, light poles, and signs where reliable, repeatable foundations are essential.
By Dass Rebar • Last updated: 2026-07-02
At a Glance: Overview
A sonotube rebar cage is a pre-tied cylinder of reinforcing steel sized to the inside diameter of a concrete form. It keeps bars in precise position and preserves concrete cover during placement. The result is a stronger, straighter footing with predictable capacity and fewer rework issues.
Here’s what you’ll find in this complete, practical guide designed for Ontario job sites and Woodbridge crews:
- Plain-language definitions, plus when and where to use sonotube rebar cages
- Design basics: bar sizes (10M, 15M, 20M), cover, tie spacing, and cage length
- How cages work in compression, tension, and shear for footings and pole bases
- Step-by-step fabrication and installation workflow you can hand to your crew
- Best practices pulled from Dass Rebar’s in-house detailing, fabrication, and delivery experience
- Inspection checklists, QA tips, and a pre-pour readiness table
- Local, Woodbridge-specific notes to streamline staging and delivery windows
What Is a Sonotube Rebar Cage?
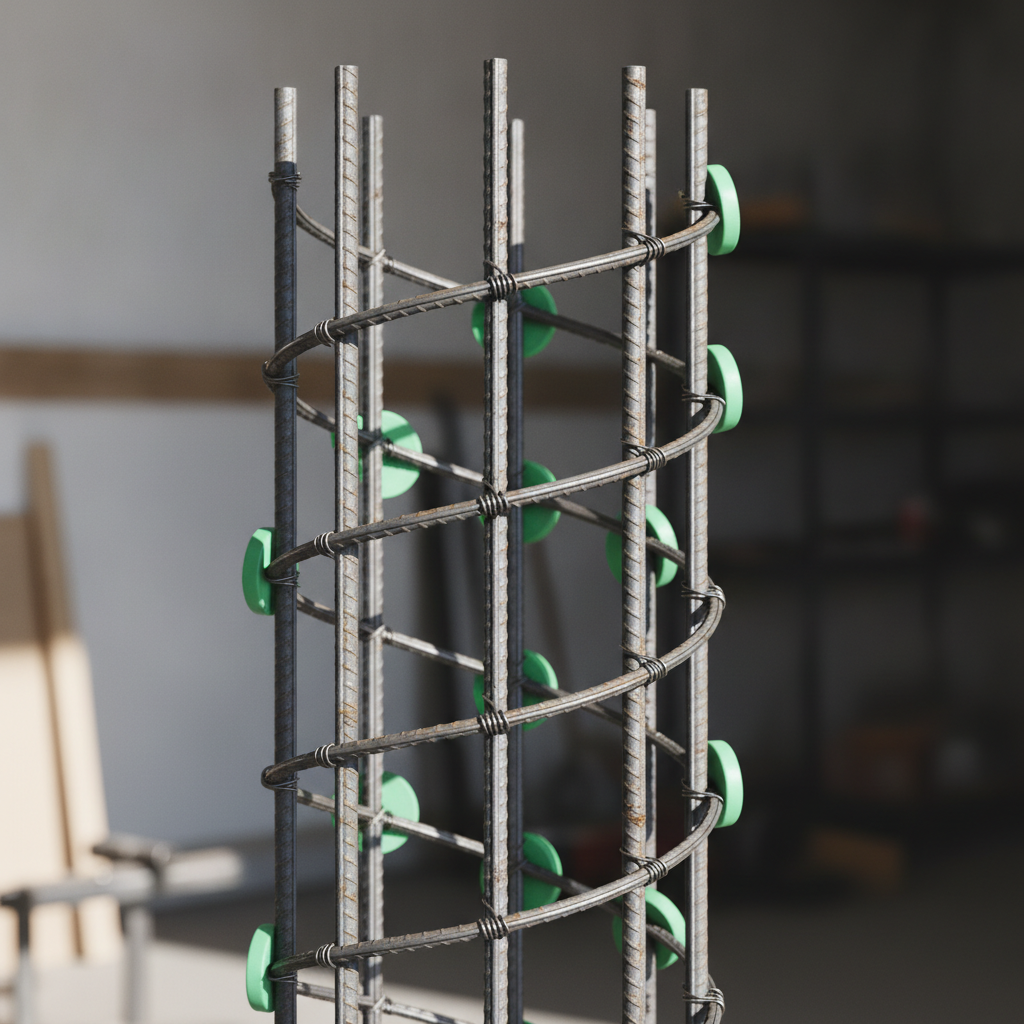
A sonotube rebar cage is a cylindrical assembly of vertical bars and ties placed inside a fiber form to reinforce a round concrete footing or pier. It maintains bar spacing, ensures concrete cover (typically 2–3 inches below grade), and provides anchorage for loads like deck posts or light poles.
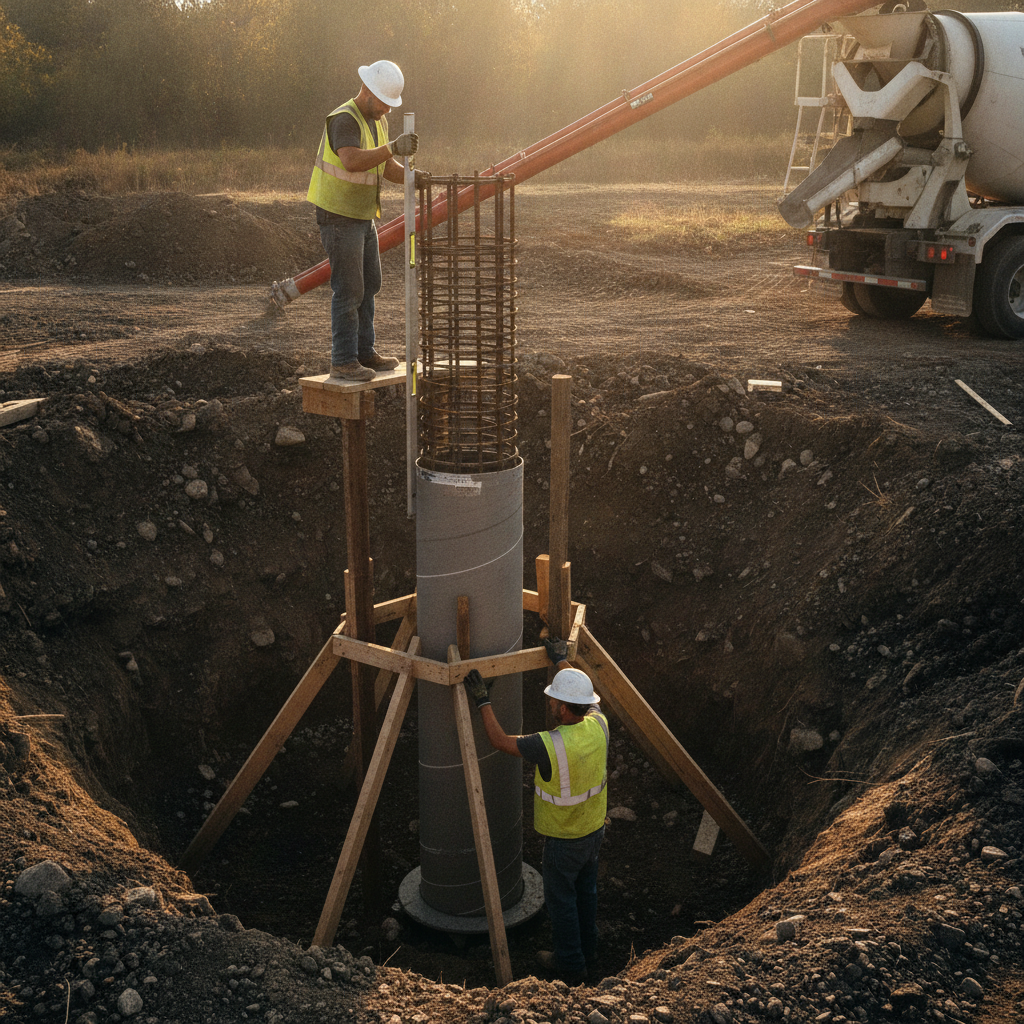
In simple terms, it’s the “skeleton” that helps a round footing perform predictably under gravity, wind, and uplift. The cage is tied before placement, lowered into the form, centered with spacers, and held to elevation until the pour is complete.
- Common diameters: 10–36 inches for small structures; larger for heavy poles or signs.
- Typical bar sizes (Canada): 10M ≈ #4, 15M ≈ #5, 20M ≈ #6 (U.S. equivalents shown).
- Tie spacing: Often 6–12 inches on center; closer near the top for anchor stability.
- Concrete cover: 2 inches above grade, 3 inches below grade is a common field rule.
Because we supply Grade 400W and 500W (with epoxy-coated options) and Glass Fiber Reinforcing Bars (GFRB), our teams routinely advise which material aligns with durability, constructability, and schedule goals for Ontario projects.
Why Sonotube Rebar Cages Matter
Sonotube rebar cages reduce placement error, keep bars within code-required cover, and improve the footing’s resistance to bending, shear, and uplift. They also speed inspection because bar size, spacing, and cage geometry are visible before concrete placement.
On busy GTA sites, predictable outcomes beat guesswork. A tied cage locks in geometry, so a 24-inch by 6-foot pier behaves as designed. That means straighter anchor bolts, fewer callbacks, and faster deck or pole installation once concrete reaches strength.
- Fewer field fixes: Pre-tied cages reduce on-the-fly corrections that can delay pours.
- QA visibility: Inspectors can quickly verify bar size, spacing, and cover before placing concrete.
- Performance under load: Cages help resist overturning from wind and satisfy uplift checks.
- Schedule certainty: Consistent cages keep concrete day efficient, often trimming hours off set-up.
In our experience, standardizing a cage detail—say, four 15M verticals with 10M hoops at 8 inches—can cut install variability by more than half across a multi-pier scope.
How Sonotube Rebar Cages Work
A cylindrical cage converts a round footing into a composite section where concrete takes compression and steel resists tension. Ties prevent bar buckling, maintain radial spacing, and confine the core, improving ductility and crack control under service loads.
Think of the cage as the geometry keeper. Vertical bars carry tension from bending; hoops or spirals hold them in place. Proper cover protects steel from moisture and salts. In pole bases, tight tie spacing near the top stabilizes anchor bolts and sleeves.
- Load paths: Gravity loads compress the concrete; lateral loads put one side of the pier in tension where steel works hardest.
- Confinement effect: Spirals and hoops confine the core, improving post-cracking behavior.
- Cover as protection: Each extra 0.5 inch of cover can meaningfully delay corrosion in aggressive environments.
- Anchor zone: Denser ties (4–6 inches) near top plates keep hardware aligned during vibration.
We routinely coordinate anchor layouts with detailing so bolt circles, projection heights, and templates marry cleanly with the cage head ties.
Types, Materials, and Approaches
Most sonotube cages use 10M–20M verticals with 10M hoops or a continuous spiral. Materials range from black and epoxy-coated steel to GFRP for corrosion-sensitive sites. Approaches vary by application: deck footings, light pole bases, sign and fence posts.
Common cage configurations
- Deck footings (18–24 in.): 3–4 verticals (10M or 15M) with 10M hoops at 8–12 in.
- Light pole bases (24–36 in.): 6–8 verticals (15M or 20M), tighter ties (6–8 in.) near anchor zone.
- Fence/sign posts (12–18 in.): 3 verticals (10M) with 10M hoops at 10–12 in.
- High-corrosion zones: Epoxy-coated bars or GFRB; add 0.5–1 in. extra cover where allowed by design.
Material choices
- Grade 400W vs 500W: 500W increases capacity for the same bar area; helpful when forms are diameter-limited.
- Epoxy-coated: Recommended near de-icing salts or splash zones; watch bend radii and field handling.
- GFRB: Non-corrosive and lightweight; verify lap lengths and modulus differences in design.
- 10M / 15M / 20M mapping: ≈ #4 / #5 / #6 for U.S. readers comparing specs across borders.
Hoops vs. spirals
- Discrete hoops: Easy to count and inspect; simple to tie on site; great for small runs.
- Continuous spiral: Excellent confinement, fast in fabrication; best when you want consistent tie spacing.
- Hybrid heads: Add a few tight hoops at the top for anchor control, even if the body uses a spiral.
When schedules are tight, our team can pre-fabricate these cage types and deliver them labeled by location. That shortens staging time and improves day-of-pour flow.
Best Practices That Make Cages Bulletproof
Standardize details, protect cover, and control alignment. Use spacers at 120° or 90° points, pre-check elevation, and tighten tie spacing at the anchor zone. Pre-label cages and templates to compress staging and inspection time.
Detailing and submittals
- Specify clear cover: 3 in. below grade, 2 in. above grade unless design says otherwise.
- Call out bar sizes and laps (e.g., 15M verticals with 10M hoops at 8 in. o.c.).
- Provide anchor bolt patterns, projection, and template thickness.
- Note tie spacing changes near top 18–24 in. for bolt stability.
Fabrication and delivery
- Pre-bend hoops to the form I.D. minus cover; verify fit with a sample sonotube.
- Bundle cages by location ID; tag with diameter, length, and bar schedule.
- Use spacers/chairs rated for round forms; avoid wood scraps that shift under vibration.
- Schedule trucking so cages land same day as forms and anchors to reduce site handling.
Placement and pour
- Lower the cage with a nylon sling to avoid coating damage on epoxy bars.
- Install three or four cover spacers equally around the cage circumference.
- Set top elevation with a story pole or laser; brace with cross sticks until the first lift sets.
- Use a pencil vibrator in short dips; avoid touching the cage to prevent shifting.
We’ve found that a 10-minute pre-pour huddle—roles, sequence, anchor template check—reduces placement errors by 30–40% across crews new to this workflow.
Tools, Materials, and Resources
Successful sonotube cage work needs the right consumables and checks: tie wire, spacers, a template for anchors, a pencil vibrator, and a short pre-pour checklist. Standardize your kit so every hole follows the same rhythm.
Field kit checklist
- Tie wire or battery tie tool; linesman pliers; side cutters
- Spiral or hoops (10M) pre-bent to diameter; vertical bars (10M–20M)
- Plastic spacers for round forms; non-absorbing chairs for base
- Anchor bolt template; level; laser; story pole; tape
- Sonotubes; stakes; stringline; bracing sticks; screws
- Pencil vibrator; chute/boom plan; washout area
Pre-pour readiness table
| Item | What to verify | Why it matters |
|---|---|---|
| Cage diameter | Clear cover achieved all around (2–3 in.) | Protects steel; avoids honeycombing at edges |
| Tie spacing | 6–12 in.; 4–6 in. near anchors | Prevents bar bowing; stabilizes hardware |
| Elevation | Top set to template height | Ensures bolt projection and base plate fit |
| Form stability | Braced to resist lateral movement | Keeps plumb in wind and during vibration |
| Concrete plan | Sequence, lift height, vibrator access | Controls segregation; improves finish |
For deeper background on reinforcing choices, see our internal guides on rebar fabrication, reinforcing steel basics, and comparing steel reinforcement options.
Step-by-Step: From Layout to Pour
Lay out centers, set forms plumb, assemble or place the cage with spacers, fix elevation, install the anchor template, and place concrete in controlled lifts with light vibration. Finish and re-check bolt projection before initial set.
- Layout and excavation: Mark centers; drill or dig to design depth (GTA frost depth is often 42 in.).
- Set forms: Cut sonotubes square; stake and brace; check plumb in two directions.
- Pre-fit cage: Verify cover using spacers; confirm tie spacing and bar tags match detail.
- Lower and center: Use nylon slings; set spacers at 90° or 120°; confirm elevation.
- Anchor template: Fix bolt circle, projection, and orientation; double-check nut/washer clearance.
- Pour plan: Target a moderate slump; place in 12–18 in. lifts; pencil vibrate quickly.
- Finish and protect: Re-check projection; cover from rain; remove bracing after set.
Pro tip: Label the template “NORTH” and the pole base orientation. Crews reusing templates reduce mis-rotations and keep luminaires facing where the site plan intends.
QA, Inspection, and Documentation
Inspect before you pour: bar size and count, tie spacing, cover, elevation, and anchor layout. Photograph each cage with a tape on key dimensions. Quick visual records save hours if questions arise post-pour.
- Bar verification: Count verticals and ties; measure one bar diameter to confirm size.
- Cover check: Snap a pic of spacers touching form; measure 2–3 in. clear all around.
- Elevation: Laser a top; keep a note of height vs. design.
- Anchors: Photo the template, projection, and orientation; keep a log per pier.
- Concrete log: Record slump feel and lift heights; note any adjustments.
For crews new to cages, a two-page checklist and a photo log reduce misses and provide defensible records for GCs and municipalities.
Design Numbers and Rules of Thumb
Field rules speed decisions: 2–3 in. cover, ties at 6–12 in., tighter at the anchor zone, and frost depth around 42 in. in the GTA. Map 10M≈#4, 15M≈#5, 20M≈#6 for cross-border specs. Confirm all values against sealed drawings.
- Cover: 3 in. below grade is a durable default for buried piers; use 2 in. above grade unless design dictates otherwise.
- Tie spacing: 8 in. is a reliable middle ground; pull to 4–6 in. within top 18–24 in. for anchors.
- Depth: 42 in. to bottom often clears frost in Peel/York; verify with the AHJ.
- Bar mapping: 10M (≈ #4), 15M (≈ #5), 20M (≈ #6) keep procurement flexible.
- Concrete lifts: 12–18 in. helps vibration reach; avoid >24 in. to limit segregation risk.
When tolerances tighten, we recommend moving from hoops to a continuous spiral to improve confinement and inspection confidence.
When to Choose Epoxy-Coated or GFRP Bars
Use epoxy-coated or GFRP cages where corrosion risk is high: de-icing salts, splash zones, or chemical exposure. Epoxy preserves steel; GFRP is non-corrosive and lightweight. Check design for lap lengths, bend radii, and compatible anchors.
- Epoxy-coated steel: Good fit for urban curb-lines and parking lots with winter salt spray.
- GFRP: Zero corrosion; lighter handling; confirm modulus and creep in design notes.
- Hybrid strategies: Use coated verticals with standard ties to balance cost, durability, and handling.
If you’re deciding between 15M epoxy verticals and black steel with added cover, we can review drawings and suggest a constructible path aligned with supply and schedule.
Case Examples from Ontario Sites
Standardizing sonotube cages speeds production and reduces errors. On multi-pier scopes, labeled, pre-tied cages cut staging time, while tighter tie spacing at anchor zones helps crews hit bolt projections on the first try.
- Retail pole bases (Woodbridge): For a plaza retrofit near Queen St / Highway 50, we pre-tied 30+ cages with six 15M verticals and 10M hoops at 6–8 in. around the anchor zone. Crews hit bolt projection on all bases.
- Townhouse decks (GTA infill): A run of 50 deck piers used 10M verticals with 10M hoops at 10 in. o.c. Standard tags and a one-page install sheet kept productivity consistent across trades.
- Sign foundations (corridor near Fogal Rd / Highway 50): Spirals improved confinement in lean soils; photo logs simplified sign-off with the AHJ.
Because we manage estimating, detailing, fabrication, delivery, and on-site assembly, we can dial in the level of pre-fab that keeps your crew moving without congesting laydown.
Local considerations for Woodbridge
- Plan deliveries to avoid peak congestion near Queen St / Highway 50; morning windows often keep staging clean.
- Winter pours need warm water or accelerated mixes; verify frost depth and protect forms from heaving.
- Coordinate anchor templates in advance when poles interface with municipal lines; it shortens inspection time.
Common Mistakes and How to Avoid Them
Most issues trace to cover, elevation, or anchor alignment. Use proper spacers, set tops with a story pole or laser, and lock a bolt template before the pour. Photograph checks so everyone is confident to place.
- Insufficient cover: Skipping spacers leads to exposed steel; use purpose-built circular spacers.
- Lost elevation: Bracing slips under vibration; pin and cross-brace until concrete gains body.
- Mis-rotated templates: Mark orientation; assign one checker before placing the top lift.
- Over-vibration: Keep dips short; watch for segregation; don’t let the head strike steel.
- Unlabeled cages: Tag each cage to its location to prevent diameter or length mix-ups.
Teams that run a 6-point pre-pour check reduce rework while keeping concrete trucks cycling on time.
Integrating Cages into Your Project Workflow
Move coordination upstream. Have estimating, detailing, and fabrication agree on bar marks, tie spacing, and template details early. Deliver labeled cages just-in-time to match form setting and inspection windows.
Because Dass Rebar is MTO-approved and operates an in-house trucking fleet, we can align deliveries with your crew’s rhythm. Many Ontario GCs slot small cage drops alongside welded wire mesh or straight bar stock to consolidate handling.
- Loop in our team during in-house estimating for fast takeoffs on decks, poles, or signs.
- Use in-house detailing to codify standard cages and avoid site improvisation.
- Lean on fabrication + delivery for labeled, ready-to-stage bundles.
- Request on-site assembly support for complex anchor heads or tight timelines.
For reference builds and specs, explore our guides on footing rebar details, prefabricated cages, and using 20M rebar effectively.
Need shop drawings or pre-tied cages? Our Woodbridge-based team can standardize your sonotube rebar cages, coordinate anchor templates, and stage deliveries to match your pour schedule. Share your drawings and we’ll advise within one business day.
Tools, Templates, and Downloads
Codify your process. Use a one-page cage template, a labeled anchor plate drawing, and a pre-pour checklist. These three documents keep layouts consistent and inspections quick, even when crews rotate between tasks.
- Cage template: Bar list, tie spacing graphic, and cover note; print one per location.
- Anchor plate sketch: Bolt circle, projection, and orientation; laminate for reuse.
- Pre-pour checklist: Six essential checks and a photo log prompt.
If you build similar piers often, lock these templates into your project manual so new supers inherit the same process language and checks.
Frequently Asked Questions
Most questions focus on bar size, tie spacing, and when to use epoxy or GFRP. Here are quick, direct answers your crew can apply immediately on site. Always confirm final values against sealed drawings and local codes.
What size rebar should I use in a 24-inch sonotube footing?
Four to six 15M verticals (≈ #5) with 10M hoops at 8–12 inches on center is a reliable starting point for many deck and light pole bases. Increase bar count or move to 20M (≈ #6) where loads or heights are higher. Always follow the engineer’s sealed detail.
How much concrete cover do I need around the cage?
Aim for 3 inches below grade and 2 inches above grade unless the design or code requires otherwise. Use circular spacers at 90° or 120° around the cage so cover stays consistent during vibration and while setting the anchor template.
Should I choose epoxy-coated steel or GFRP for sonotube cages?
Pick epoxy-coated steel where de-icing salts or splash exposure are likely. Use GFRP when you want zero corrosion and lighter handling. Confirm lap lengths, bend radii, and anchor compatibility in the structural design before procuring materials.
What’s the right tie spacing near anchor bolts?
Many details tighten ties to 4–6 inches on center within the top 18–24 inches to stabilize the anchor template and keep bolts plumb. The body of the pier can often run at 8–12 inches on center where loads are lower.
Conclusion and Next Steps
Strong footings start with repeatable sonotube rebar cages: right bar sizes, correct cover, tight anchor zones, and clean staging. Standardize your kit and documents, then align deliveries to your pour plan to speed production and reduce rework.
- Key takeaways: 2–3 in. cover, 8 in. tie spacing (tighter near anchors), and labeled, pre-tied cages save time.
- Action: Consolidate detailing, fabrication, and delivery with one partner to reduce handoffs.
- Next step: Share your drawings; we’ll propose standard cage details aligned to Ontario practices.
For broader context on reinforcing performance and related building systems, you can review our partner content on why steel framing matters, explore how rebar strengthens concrete, or read about benching versus underpinning as it relates to foundation strategies. These pieces expand the structural picture without changing your sonotube workflow.
Ready to standardize sonotube rebar cages? Book a short discovery session with Dass Rebar’s Woodbridge team. We’ll align bar marks, tie spacing, and delivery windows around your schedule. Meet us on site or at our office to review drawings and staging.