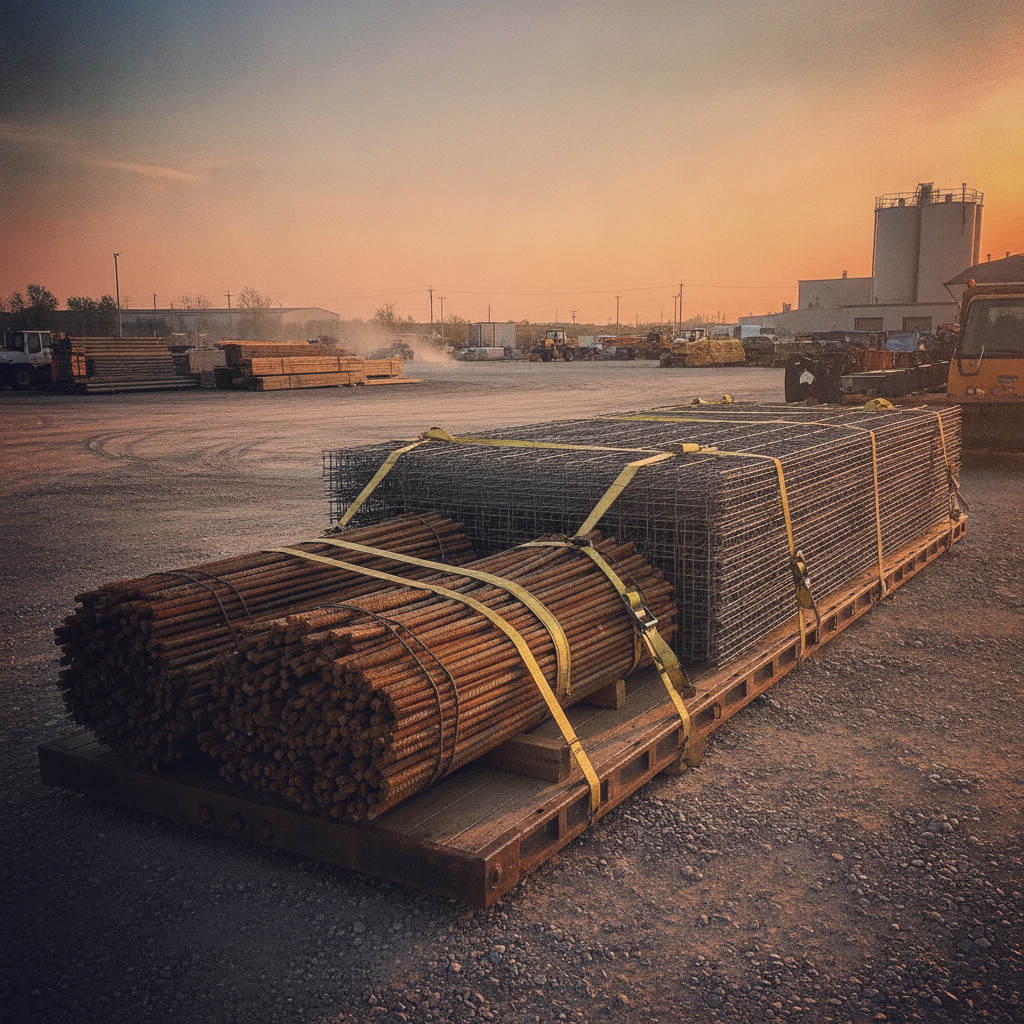
Weld mesh reinforcement is a factory-welded steel grid placed in concrete to control cracking, improve tensile capacity, and speed installation. Used correctly, it boosts slab performance while reducing on-site tying and rework. From our yard at 370 New Enterprise Way in Woodbridge, Dass Rebar stocks common mesh sizes and supports Ontario pours with estimating, detailing, fabrication, and delivery.
By Navjot Dass • Last updated: 2026-06-16
Overview and Table of Contents
Weld mesh reinforcement strengthens slabs and light walls while saving time on site. This complete guide defines WWR, shows when it outperforms rebar, and explains specifying, placing, and inspecting it—plus Ontario-specific logistics—so crews pour on schedule with predictable quality.
Here’s what you’ll learn at a glance:
- What welded wire reinforcement (WWR) is and why it matters
- How WWR works inside concrete and where it fits vs. stick rebar
- Common sizes—6″ x 6″ at 6/6, 9/9, 10/10—and how to specify them
- Best practices for laps, chairs, joints, and pre-pour inspection
- Ontario logistics: staging, bundling, and timed trucking from Woodbridge
Use the links below as you go:
- Compare systems in our rebar vs. mesh guide.
- See mesh options in wire mesh overview.
- Plan pours with the mesh concrete guide.
What Is Weld Mesh Reinforcement?
Weld mesh reinforcement—also called welded wire reinforcement (WWR)—is a prefabricated grid of steel wires resistance-welded at intersections. It’s specified by spacing (often 6″ x 6″) and wire size (e.g., 6/6, 9/9, 10/10) and used to control crack widths, distribute loads, and accelerate placement in slabs and light sections.
In the field, WWR arrives as flat sheets or rolls. Sheets typically lay flatter—with fewer “memory” issues—making them ideal near edges, columns, and penetrations. Rolls cover long bays fast but may require additional chairs and ties to counter curvature. For slab-on-grade work, contractors often target 1.5–2.0 inches of top cover, placing mesh in the upper third of the slab for shrinkage control.
- Typical formats: 6″ x 6″ spacing with wire sizes 6/6, 9/9, or 10/10; bundles are labeled by pour sequence.
- Common uses: Slabs-on-grade, sidewalks, driveways, toppings, and light foundation walls.
- Complementary elements: Dowels, vapor barriers, control joints, and chairs every 3–4 ft to hold elevation.
Dass Rebar stocks standard mesh alongside Grade 500W and 400W rebar (epoxy-coated available), Glass Fibre Reinforcing Bars (GFRB), and 10m, 15m, and 20m bar sizes. Our in-house estimating and detailing reduce errors, while dedicated trucking keeps deliveries aligned to pour windows.
Why Weld Mesh Matters
Concrete shrinks and cracks as it cures and cycles through temperatures. A welded wire grid holds microcracks tight and spreads tension across the slab, improving serviceability and appearance. Because WWR installs quickly, crews often save several labor-hours per slab bay while improving uniformity.
Concrete excels in compression but is weak in tension. As slabs dry, tensile strains develop and cracks form. Uniform reinforcement manages this reality by limiting crack width rather than trying to prevent every crack. In practice, crack widths under about 0.012–0.016 inches remain visually acceptable and reduce water ingress risk for many slabs; tight control also aids finishes and joint performance.
- Serviceability: Distributed steel keeps cracks narrow, improving durability and reducing callbacks.
- Speed: Prefabricated grids can replace hundreds of individual ties, accelerating placement by 20–40% on typical bays.
- Consistency: Factory spacing yields predictable performance across large floor plates.
On GTA projects with narrow closures, we frequently pre-cut and label sheets to bay dimensions. Staging mesh within 30–60 minutes of pump arrival minimizes traffic conflicts and lets finishers hit flatness targets without stop‑start delays.
How Weld Mesh Reinforcement Works
WWR creates a continuous steel network that engages as microcracks form. Welded intersections let tension transfer in both directions, distributing stresses and keeping cracks tighter. With correct cover, lap lengths, and joint coordination, the grid remains effective for the slab’s service life.
Mechanically, resistance-welded intersections provide transverse and longitudinal continuity. Under restraint (drying, curling, thermal), the slab wants to move; the mesh shares tensile demand so one crack doesn’t open excessively. Proper placement is crucial: chairs and ties prevent “floating” as concrete is vibrated and finished.
- Elevation: Maintain design cover—commonly 1.5–2.0 inches—to keep steel near the tension zone.
- Laps: Overlap sheets by at least one full mesh spacing unless the design calls for more; tie every 12–18 inches along the lap.
- Joints: Control joints at 24–36 times slab thickness help direct cracks and coordinate with reinforcement.
- Integration: Combine WWR with perimeter bars, dowels at joints, and sound subgrade to reduce edge curl.
For example, a 5-inch slab might target control-joint spacing of 10–15 feet; aligning those cuts with mesh laps reduces restraint and random cracking. Where point loads or penetrations concentrate demand, add 10m–20m bars per the design around openings and at slab edges.

Types, Sizes, and Approaches
Most contractors choose 6″ x 6″ welded wire mesh in 6/6, 9/9, or 10/10 wire sizes. Use sheets when flatness and edge control matter; use rolls for long, open bays. Select chairs, vapor barriers, and joint plans to match slab thickness, exposure class, and load path.
Dass Rebar keeps 6″ x 6″ mesh in the popular 6/6, 9/9, and 10/10 sizes for short lead times. Heavier wire increases stiffness and crack-control capacity; the engineer’s design governs selection. Rolls can reduce handling steps on 60–100 ft runs, while sheets simplify cutting around columns and embeds and tend to sit flatter out of the bundle.
- Sheet vs. roll: Rolls speed coverage; sheets reduce curl and ease trimming at penetrations.
- Wire size: Larger numbers indicate heavier wire and greater cross-sectional area; confirm against design loads.
- Exposure: Consider epoxy-coated or GFRB alternatives where corrosion risk is high.
- Pairings: Use compatible chairs, vapor barriers (≥10 mil where specified), and curing to meet finish and durability goals.
Need more context before deciding? Our WWR quick guide and mesh selection article outline practical selection steps and field tips we use across Ontario jobs.
Welded Wire Mesh vs. Rebar
Use welded wire mesh for distributed crack control and speed in slabs-on-grade and toppings. Choose rebar where the design calls for concentrated steel, anchorage, hooks, or development length—beams, pedestals, edges, and heavy walls. Many designs combine both for best results.
Each reinforcement family excels when used purposefully. For wide slab areas, WWR controls shrinkage cracking efficiently and installs quickly. For load-intense regions and complex geometry, stick rebar provides precise anchorage with bends, hooks, and splice control. We often detail WWR in fields with 10m–20m bars at edges, column strips, and openings.
| Use Case | Welded Wire Mesh | Rebar |
|---|---|---|
| Large slabs-on-grade | Fast coverage; uniform crack control | Slower to place; typically unnecessary |
| Beams, columns, pedestals | Not typical | Preferred for anchorage and development |
| Toppings and light walls | Effective distribution steel | Use where concentrated demand exists |
| Complex openings/geometry | Sheets trim to fit; verify laps | Custom bars and ties fit geometry |
| Corrosive exposure | Epoxy-coated or GFRB mesh | Epoxy-coated or stainless bar |
For a deeper dive into bar behavior, see our rebar complete guide. It explains development length, hooks, and lap-splice logic that drive rebar-heavy details.
Best Practices for Specification and Placement
Clear specifications, accurate takeoffs, and disciplined placement deliver the best results. Define mesh type, spacing, laps, and supports; coordinate joints; and verify cover and continuity before concrete. Pre-cut, labeled bundles and timed trucking keep crews productive and finishing consistent.
Specification and detailing
- Call out spacing and wire size explicitly (e.g., 6″ x 6″ at 6/6, 9/9, or 10/10) on drawings.
- State lap length and tie intervals; many crews tie every 12–18 inches along the lap.
- Show chairs/supports and target cover; top cover of 1.5–2.0 inches is common for slabs-on-grade.
- Coordinate control joints (often 24–36 × thickness) with reinforcement to limit restraint.
Pre-pour preparation
- Verify subgrade compaction; protect vapor barriers (≥10 mil) from puncture and ensure tight seams.
- Stage bundles by pour sequence; pre-cut around columns to reduce on-floor trimming by 30–50%.
- Install chairs at roughly 3–4 ft spacing; tie laps to prevent flotation during vibration and finishing.
- Dry-run pump and finisher paths to avoid moving staged steel under time pressure.
Inspection and QA
- Check cover, elevation, and continuity at edges and openings with a measuring tape before concrete.
- Confirm joint locations, dowel alignment, and isolation details match the plan.
- Document with photos and a pre-pour checklist for close-out and warranty records.
Our team closes loops here with coordinated shop drawings and delivery slots that match your calendar. For a fast refresher on options, skim our wire mesh overview and WWR quick guide.
Tools, Standards, and Resources
Simple field tools and clear specs make WWR successful. Use chairs, tie wire, bolt cutters, and tapes to hold elevation and continuity; reference applicable standards for material and placement; and retain mill certs, delivery tickets, and photo records for quality files.
Field teams typically rely on wire-tying tools, bolt cutters, measuring tapes, chalk lines, and durable chairs that won’t puncture vapor barriers. Where epoxy-coated mesh or GFRB is specified, use compatible non-metallic chairs and adjust handling to protect coatings and fibers. For product data and properties, see this welded mesh reference.
- Tools: Chairs, tie-wire tools, bolt cutters, measuring tapes, chalk lines, and gloves.
- Records: Delivery tickets, mill certs, pre-pour photos, and inspection checklists.
- Background reading: If you’re new to steel behavior in concrete, review how rebar strengthens concrete for load-sharing concepts.
For panelization context, the framing stiffness discussion in this heavy-gauge framing guide helps illustrate why stiffer members deflect less—an idea that maps to mesh selection and chair spacing.
Case Studies and Ontario Examples
Coordinated mesh, bars, and logistics deliver faster placements and tighter crack control. Pre-cut WWR, labeled bundles, and timed trucking reduce on-floor trimming and site congestion, helping teams maintain cover and finish quality on tight Ontario pour windows.
- High-rise podium slab (Toronto): WWR sheets staged by bay with perimeter 15m bars and 10m temperature steel at edges. Crews tied laps every ~12 inches, used 3–4 ft chair spacing, and met finish targets without rework.
- Municipal sidewalks (GTA): 6″ x 6″ mesh with joints at 4–6 ft intervals. Early-morning deliveries maintained traffic control windows and inspector sign-offs.
- Topping slab (Waterloo): Light mesh over existing deck with doweled joints. Pre-cut panels around MEP risers cut trims by roughly 40% and kept mesh in plane.
- Warehouse bay (Pickering): Rolls used for 80-ft runs; extra ties controlled curl memory. Dowels aligned with sawcuts within ±1/4 inch, limiting random cracks.
- Retail infill (Vaughan): Sheet bundles sized for narrow access; crane picks limited to under 10 minutes per bay to keep finishers moving.
These patterns echo what we deliver daily across the GTA: accurate takeoffs, shop drawings, fabrication, and punctual trucking—so crews pour when weather and permits cooperate. If you’re planning a combined system, our mesh selection article covers practical hybrids that pair WWR with 20m rebar near penetrations and edges.
Local Installation and Logistics (Woodbridge & York)
In Woodbridge within the Regional Municipality of York, job success hinges on timing and access. Our nearby yard shortens hauls, while staged mesh deliveries and labeled bundles reduce traffic on tight sites. Coordinating flows with municipal schedules keeps pours predictable, even in peak season.
Local considerations for Woodbridge
- Plan deliveries around peak traffic near Highway 50 corridors; sites close to Queen St / Highway 50 benefit from early-morning staging and clear crane zones.
- Winter pours demand extra vigilance on subgrade moisture and vapor barriers; heated enclosures should be ready before mesh placement and inspection.
- For infill projects near the Highway 50 – Zum Queen Stop EB area, request smaller sheet bundles to maneuver without blocking access or transit lanes.
From 370 New Enterprise Way, our dedicated fleet schedules drop windows to your pour sequence. Pre-slung bundles, clear tagging, and on-truck staging reduce double-handling and speed set-up by 20–30% on typical bays.
Need a fast, compliant mesh package? We detail, fabricate, label, and deliver welded wire mesh with bars, dowels, and accessories—sequenced to your pour window so finishers can focus on flatness and cure.
Skim our WWR quick guide or dive into the mesh concrete guide to align your next pour.
Frequently Asked Questions
Here are concise answers to common WWR questions about laps, elevation, finish compatibility, and choosing mesh vs. rebar. Share them in pre-task meetings to align crews and inspectors before the pour.
What does 6″ x 6″ at 6/6 mean?
It means welded wire reinforcement with 6-inch by 6-inch spacing and wire size “6” in both directions. The wire size correlates to cross-sectional area and strength. Match spacing and size to the engineer’s design and confirm lap lengths and cover on the drawings.
Where should mesh sit within a slab?
Usually in the upper third of the slab to control shrinkage cracks unless the design states otherwise. Use chairs (often spaced 3–4 ft) to maintain top cover—commonly 1.5–2.0 inches—and tie laps so the grid stays in plane during vibration and finishing.
How much should I overlap sheets?
Follow project specifications and the structural design. A common field practice is at least one full mesh spacing with ties every 12–18 inches along the lap. Some exposures or load conditions may require more—confirm with the engineer.
Is mesh acceptable for driveways and sidewalks?
Yes—WWR is widely used for sidewalks and light-duty pavements when placed with correct cover, joints, and subgrade preparation. For heavier vehicle loads or freeze-thaw sensitivity, verify reinforcement and joint strategy with the design professional.
When is rebar better than mesh?
Choose rebar where the design needs concentrated steel, anchorage, hooks, or precise development length—like beams, pedestals, and transfer zones. Many slabs combine both: WWR for distribution in the field and 10m–20m bars at edges and around penetrations.
Key Takeaways
Specify mesh clearly, place it accurately, and coordinate deliveries. Use mesh for distributed crack control and speed, and use rebar where concentrated strength is needed. Pre-cut, labeled sheets and punctual trucking are the simplest wins for schedule, safety, and quality.
- Weld mesh reinforcement controls crack widths and speeds placement by reducing tie labor.
- Match wire size, laps, and chair spacing to the engineer’s design and exposure class.
- Use control joints (often 24–36 × thickness) aligned with reinforcement to guide cracking.
- Combine WWR with 10m–20m bars at edges, penetrations, and concentrated load paths.
- Rely on in-house estimating, detailing, and scheduled delivery to remove friction.
Conclusion
Weld mesh reinforcement delivers reliable crack control and quicker installs when specs and placement are disciplined. Pair it with targeted rebar, accurate takeoffs, and punctual delivery to reduce risk, rework, and downtime across Ontario projects.
If you’re planning slabs, toppings, sidewalks, or light walls, bring us in early. We’ll align mesh, bar, logistics, and shop drawings so your crew can focus on placing concrete and hitting finish targets. Explore options in our wire mesh overview and compare systems in the rebar vs. mesh guide.