Epoxy coated rebar is carbon steel reinforcement with a factory-applied fusion-bonded epoxy layer that shields steel from moisture and chlorides. The coating thickness typically ranges in the single-digit mils, forming a continuous barrier. For projects in 370 New Enterprise Way and across Ontario, this corrosion defense helps concrete last longer with fewer repairs.
By Dass Rebar Editorial Team — Last updated: 2026-05-08
Above the fold: why epoxy-coated rebar now
Epoxy-coated reinforcing steel extends the service life of concrete by isolating rebar from water and deicing salts. It’s specified for bridge decks, parking structures, podium slabs, and coastal or winter-salt exposure. When paired with accurate detailing, careful fabrication, and clean delivery, it reduces premature cracking, spalling, and unplanned shutdowns.
Here’s what you’ll get in this complete guide from our MTO-approved team serving the GTA and Ontario:
- Plain-English definitions and when epoxy rebar makes sense
- How the coating is applied, tested, handled, and repaired
- Selection help versus black bar, galvanized, stainless, and GFRP
- Best practices for estimating, detailing, and fabrication flow
- Procurement, logistics, and quality control checklists
- Ontario-focused examples and lessons from active jobs
At a glance
- Use epoxy-coated bar in decks, ramps, podiums, and any slab repeatedly exposed to chlorides or freeze-thaw.
- Thickness window is commonly within a tight mil range; consistent coverage beats extra-thick builds.
- Handling matters: nylon slings, coated bar chairs, and immediate touch-up of nicks protect performance.
- Plan early: sequencing coated, bent, and bundled material with delivery windows prevents rework.
Local considerations for 370 New Enterprise Way
- Account for winter salt exposure on garages and podiums; specify coated top mats and perimeter bars to combat chloride ingress.
- Build lead time around seasonal rushes; spring and late summer pours benefit from locking in fabrication and trucking early.
- Coordinate on-site storage: use dunnage and breathable covers to keep coating clean and abrasion-free before placement.
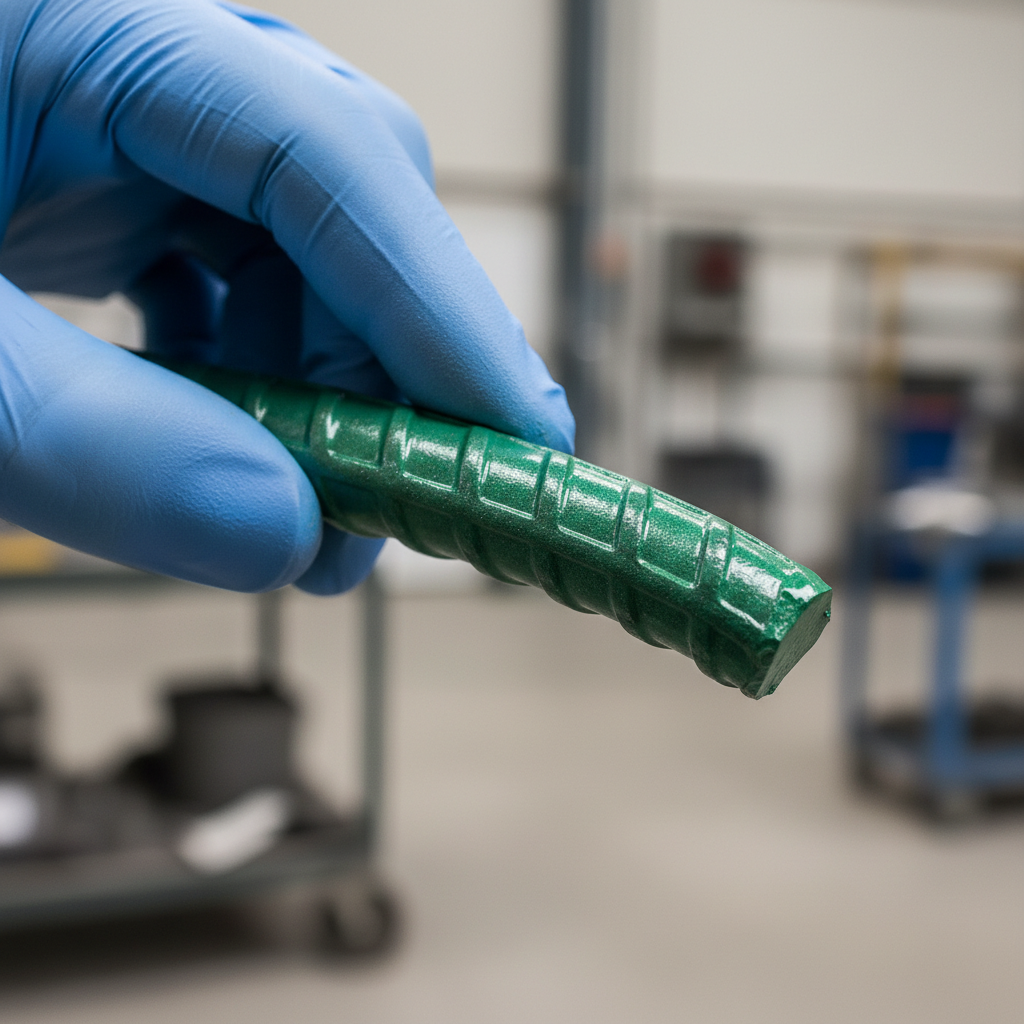
What is epoxy-coated rebar?
Epoxy-coated rebar is standard carbon steel reinforcement that’s blast-cleaned and factory-coated with a thermoset epoxy powder. Heat fuses the coating to the ribbed surface, creating a tight dielectric layer that limits corrosion. It’s a proven choice for decks, ramps, slabs, and foundations exposed to water or road salts.
In practice, the coating forms a continuous barrier over ribs and along cut lengths. Typical factory processes include surface prep, powder application, gel and cure, and quality checks on thickness and holidays (pinholes). Because the layer electrically insulates the steel, it slows the start of corrosion even when minor surface damage is repaired.
For Ontario projects, we commonly see epoxy bar used in exposed slab edges, podiums over parking, ramp approaches, and retaining structures near salted roads. It pairs well with drainage, sealers, and specified concrete cover to reduce long-term patching cycles.
Where it fits in your spec
- Bridge decks, parking garages, podium slabs, and stair cores
- Retaining walls and foundations adjacent to salted traffic
- Balconies, parapets, and cantilevers with thin cover zones
- Cold-joint rebar dowels near exposure points
Dass Rebar supports this from estimating and shop drawings through fabrication, delivery, and on-site assembly—reducing handoffs and mistakes that raise risk.
Why epoxy-coated rebar matters for durability
Chlorides breach concrete over time. When bare steel corrodes, rust expands, cracks cover, and spalls concrete. Epoxy isolates the steel, delaying corrosion onset and limiting maintenance. With proper cover, joints, and drainage, coated reinforcement supports longer service life and fewer disruptive repairs.
Durability failures don’t happen overnight. They start with microcracks, wick in moisture, and accelerate in freeze-thaw cycles. Rebar corrosion byproducts can expand significantly in volume, creating tensile stresses that concrete can’t absorb. By reducing the ionic pathway to steel, epoxy-coated reinforcement interrupts that chain reaction.
- Barrier effect: The coating is a dielectric shield that slows corrosion currents.
- Crack tolerance: Even if cover cracks, intact coating limits steel exposure.
- Repairability: Nicked areas can be patched with compatible epoxy to restore continuity.
- Lifecycle value: Fewer emergency shutdowns of ramps and decks mean steadier operations.
From our Ontario jobs, the most durable podiums pair epoxy top mats with sound drainage and edge-protection details. In our experience, careful staging—keeping coated bars clean, off the ground, and away from sharp edges—pays back in long-term performance.
How epoxy coating is applied, handled, and repaired
Manufacturers blast-clean bar, heat it, then apply electrostatically charged epoxy powder. The powder melts, flows, and cures into an adherent film around ribs and along the bar. Field handling with nylon slings and nonmetal chairs prevents scratches; any holidays or cuts are repaired using approved epoxy kits.
Here’s the typical flow you’ll see reflected in our supply chain and shop coordination:
- Surface prep: Bars are cleaned to near-white metal for reliable adhesion.
- Heat + powder: Temperature and line speed ensure melt and flow into ribs.
- Cure: Controlled dwell creates a hard, bonded layer in the target thickness range.
- Inspection: Coating thickness and holiday tests confirm coverage before bundling.
On site, use nylon slings, coated or plastic chairs, and non-abrasive spacers. Avoid dragging bundles. Cut ends and incidental nicks are addressed using compatible patching material after cleaning. Keep touch-up kits protected from dust and moisture, and log repairs in your QC notes.
Field do’s and don’ts
- Do stage on wood dunnage; don’t set bundles directly on concrete or gravel.
- Do separate coated and uncoated stock to minimize cross-abrasion.
- Do bend only within approved radii using smooth dies; don’t flame-bend.
- Do patch visible holidays promptly; don’t leave unsealed cuts before pour.
Our trucking fleet times drops so coated mats arrive near the pour window. That keeps storage short and surfaces clean, which reduces touch-up volume and preserves thickness uniformity.
Types and alternatives: choosing the right reinforcement
Select reinforcement based on exposure, structural demands, and lifecycle goals. Epoxy-coated carbon steel is versatile for chloride-prone slabs and decks. Alternatives include black bar (economical, low exposure), galvanized (zinc sacrificial layer), stainless (high corrosion resistance), and GFRP (non-corrosive, non-conductive).
Each option balances upfront effort and lifecycle outcomes. The right fit comes from exposure mapping: water, salts, temperature swings, and cover. We help contractors align selections with drawings and specifications so the submittal package clears quickly and the schedule stays intact.
| Reinforcement | Corrosion behavior | Typical use | Notes |
|---|---|---|---|
| Epoxy-coated steel | Barrier coating slows initiation | Decks, podium slabs, ramps | Requires careful handling and patching |
| Black (uncoated) steel | No added protection | Interior slabs, low-chloride zones | Verify cover and crack control details |
| Galvanized steel | Zinc sacrificial layer | Moderate exposure, splash zones | Repair protocols differ from epoxy |
| Stainless steel | Alloy-based corrosion resistance | High-risk edges, joints | Often targeted to critical details |
| GFRP (glass fiber) | Non-corrosive, non-conductive | EM-sensitive areas, deicing exposure | Different design properties vs steel |
We stock Grade 500W and 400W, including epoxy-coated options, plus welded wire mesh in standard 6×6 patterns. For a deeper dive into mesh choices, see our discussion of wire mesh types and uses.
Estimating, detailing, and fabrication: best practices
Tight takeoffs, constructible shop drawings, and clean bends keep epoxy bar performing. Call out bar marks, splice lengths, cover, chairs, and patching notes. Fabricate with smooth dies and bundle protection. Sequence deliveries to minimize yard handling and on-site storage time.
Here’s the workflow we use to reduce risk and rework for Ontario jobs:
- Estimating: Identify exposure zones on plans; apply coated vs uncoated quantities accordingly.
- Detailing: Annotate mats, lap splices, and bends; specify coated supports and repair notes.
- Fabrication: Use lined racks and smooth tooling to protect the finish during bending.
- Packaging: Separate coated bundles with spacers; label by zone and pour sequence.
- Delivery: Time drops with our rebar supply workflow to match pour schedules.
Our in-house teams collaborate—estimating flags chloride exposure, detailers document repairs and chairs, fabrication protects surfaces, and logistics compresses the gap from yard to slab. That chain lowers coating touch-ups and keeps installation fast.
QC checklist you can copy
- Confirm coating designation per drawings and legend.
- Spot-check thickness range on incoming bundles.
- Inspect bends for intact coating at the intrados.
- Verify plastic chairs/spacers and nylon slings on site.
- Log all touch-ups with location and material lot.
Need a refresher on shop drawing clarity? Explore our step-by-step rebar detailing guide for mark conventions that speed approvals.
Planning and procurement factors (no pricing)
Build your plan around exposure mapping, bar availability, fabrication lead time, and delivery windows. Lock submittals early, sequence bundled drops by pour area, and verify storage and lifting gear. Avoid last-minute substitutions by confirming coated quantities per zone and mat.
We work quote-by-quote and coordinate to your pour calendar. Our dedicated trucks reduce handoffs, and our Ontario stock of common sizes—including 10m and 15m equivalents—keeps fast-turn jobs on track. For background on material availability, you can review related products through our network at rebar products overview.
- Submittals: Include coating notes, patch materials, and storage/handling instructions.
- Lead time: Align bar marks with the pour map to stage material in order.
- Yard space: Reserve clean, off-ground storage with breathable covers.
- People and tools: Confirm coated chairs, nylon slings, and touch-up kits on delivery.
For slab designs mixing bar and mesh, learn how we combine both in our fabrication guide to simplify placement.
Applications and design notes for Ontario jobs
Prioritize epoxy-coated reinforcement for top mats in parking, podiums, and exposure edges. Use adequate cover, proper jointing, and drainage to complement the coating. In mixed systems, place coated bars where chlorides concentrate and keep them clean until pour day.
Designers often concentrate coated rebar in the most vulnerable zones—deck surfaces, perimeters, and thin-cover edges. Contractors then rely on clear bar marks, coherent bundling, and timed drops to maintain coating quality through installation.
- Parking structures: Coat top mats and ramp transitions where splash and snowmelt collect.
- Podium slabs: Focus on edges, planters, and penetrations; detail drains to avoid ponding.
- Retaining walls: Protect near-traffic faces and joint bars adjacent to salt exposure.
- Balconies: Coated bars at edges reduce visible spalls over time.
Want help sizing and mixing stock efficiently? Our 10M rebar uses guide covers common applications and how we reduce offcuts during fabrication.
Tools, resources, and how we help
Dass Rebar provides in-house estimating, detailing, fabrication, delivery, and on-site assembly. Centralized control improves accuracy and timing. We stock common grades and mesh patterns for quick turns and coordinate dedicated trucks to meet pour windows across Ontario.
Our team supports developers, general contractors, and concrete crews with job-ready packages:
- In-house estimating: Chloride exposure mapping and clear coated quantities.
- Detailing: Shop drawings that call out repair kits, chairs, and storage notes.
- Fabrication: Smooth dies and lined racks to protect finishes.
- Delivery: Sequenced drops with our rebar supply process.
- Assembly: On-site support and installation assistance when needed.
We also coordinate mesh (6×6 at 6/6, 9/9, 10/10) and can integrate GFRP where the design calls for non-conductive reinforcement. For broader structural context on light-gauge framing within our network, see this steel framing explainer.
Need help scoping epoxy-coated bar? Request a coordinated takeoff and shop drawing review. Our team will map coated zones, flag handling notes, and stage deliveries to your pour sequence.
Field installation and QC: doing it right the first time
Protect the coating during placement with nylon slings, plastic chairs, and clean staging. Patch any nicks with approved epoxy and document locations. Keep bundles off the ground under breathable covers and pour soon after placement to reduce contamination risks.
Coated bars are durable in service, but they benefit from soft handling in the field:
- Lifting: Use spreader bars and soft slings; avoid chokers that can bite.
- Supports: Plastic or coated chairs prevent abrasion at contact points.
- Cutting: Clean and patch ends; avoid grinding that heats or smears coating.
- Weather: Keep bundles covered; prevent ice or grit that can scratch during handling.
We schedule deliveries close to pours. That shortens site exposure and minimizes touch-ups. After placement, quick inspection and patching keep the dielectric barrier continuous before concrete locks everything in place.
Case studies and examples
Ontario projects using epoxy-coated rebar see smoother maintenance cycles when detailing, fabrication, and logistics align. Examples include podium and ramp work where top mats, edges, and joints were coated, bundled by sequence, and placed within tight delivery windows.
Here are representative scenarios from our portfolio and service scope:
- Toronto podium slab: Top mats and edge bars specified as coated; our detailers flagged drainage and chair types, and our trucks staged drops within the pour window.
- Waterloo residential ramp: Coated reinforcement at transitions; we prefabricated mats with protected bends to reduce on-site handling and patching.
- Pickering mixed-use deck: Concentrated coated steel near planters and perimeters; delivery sequencing limited storage time on a constrained site.
These examples share a pattern: clear coated zones, protected fabrication, and timed logistics. That’s how epoxy-coated bar realizes its durability potential on real jobs.
Quick specification and submittal checklist
Submit coated bar designations, repair material data, chair/spacer types, storage and handling notes, and delivery sequencing. Include QC plans for thickness checks and holiday repairs. Confirm exposure zones on drawings so quantities align to the pour map.
- Coating designation and thickness window
- Approved patch kit data and instructions
- Chairs/spacers (plastic or coated) and sling types
- Storage plan: dunnage + breathable covers
- QC: incoming inspection, patch logs, pre-pour checks
When you centralize these elements—estimating through assembly—you remove friction between trades and compress submittal-to-pour timelines.
FAQ: epoxy-coated rebar
Contractors ask about when to specify coated bar, how to handle it without damage, and how to compare it to galvanized or GFRP. The essentials: match to chloride exposure, use soft handling and approved patch kits, and choose alternatives only where the exposure or design demands.
When should I specify epoxy-coated rebar?
Use it anywhere chlorides, water, or freeze-thaw cycles can reach reinforcement—bridge decks, parking structures, podium slabs, and retaining walls near salted roads. Concentrate coatings on top mats, edges, joints, and other thin-cover zones to delay corrosion and reduce future patching.
How do I handle coated bars without damaging the layer?
Lift with nylon slings and spreader bars, set on plastic or coated chairs, and keep bundles on dunnage with breathable covers. Avoid dragging, chokers, and metal-to-metal contact. Patch any visible nicks or cut ends with compatible epoxy before the pour and document the repair.
Is galvanized or stainless better than epoxy-coated?
It depends on exposure and criticality. Galvanized offers sacrificial zinc protection and may suit splash zones. Stainless provides high corrosion resistance for critical edges. Epoxy-coated is versatile for decks and slabs with repeated deicing exposure. We often blend options to target risk hot spots.
Can I mix coated and uncoated bars in one slab?
Yes—designs often combine coated bars in top mats or edges with uncoated bars in low-risk zones. Keep them separated during staging to avoid abrasion, and mark bundles clearly by zone. Use plastic chairs throughout to protect both during placement.
What about welded wire mesh near chlorides?
Mesh can complement coated bars in slabs and toppings. Choose patterns like 6×6 at 6/6, 9/9, or 10/10 based on design. Staging and handling are similar—keep mesh clean, off the ground, and free of abrasion before placement to preserve performance.
Conclusion and next steps
Epoxy-coated rebar helps concrete last by isolating steel from water and salts. Its value shows up when detailing, fabrication, delivery, and placement all protect the coating. Focus on exposure mapping, clear shop drawings, soft handling, and timely pours to realize durability gains.
- Key takeaway 1: Use epoxy-coated bars where chlorides concentrate—top mats, edges, and joints.
- Key takeaway 2: Guard the coating with lined tooling, nylon slings, and plastic chairs.
- Key takeaway 3: Stage deliveries to the pour map and patch holidays before the pour.
- Key takeaway 4: Blend alternatives (galvanized, stainless, GFRP) only where design or exposure requires.
Ready to plan your next slab, deck, or ramp? Our MTO-approved team can align coated quantities, shop drawings, and delivery windows so you place faster with fewer touch-ups. Book a coordination call with Dass Rebar in 370 New Enterprise Way today.
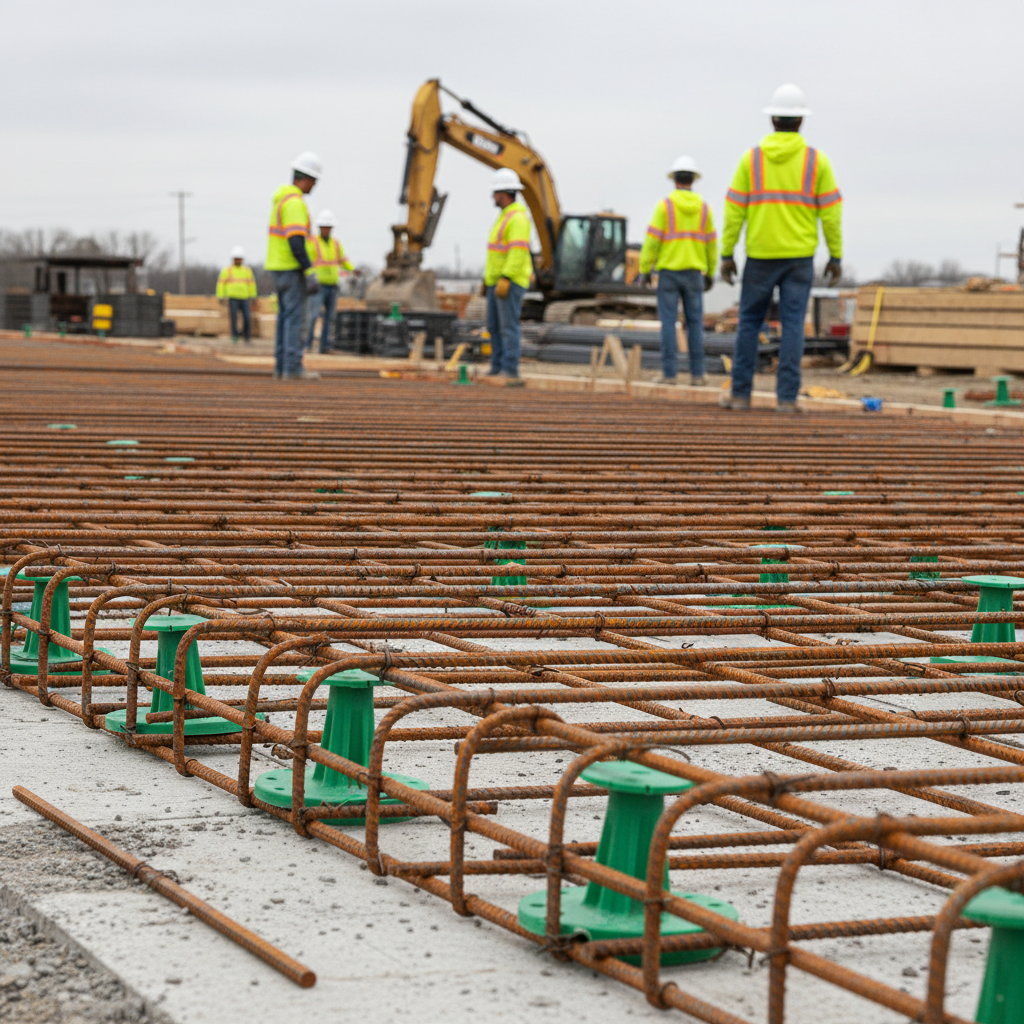
Visual reference: coating detail and jobsite scene
See how the coating looks up close and in place on a deck grid. Note the clean storage and protected support points.